SUPPLIES NEEDED
Brushes
Cup Or Bottle
Dowel Stick
Erasable Colored Pencils
Marker & Watercolor Pad
Paper Towels
Pointed Tip Scissors
Recycled Material
Recycled Newspaper
String
Tempera Paint
Tissues Or Tissue Paper
Washable No-Run School Glue
Directions
Kites may have originated in the South Sea Islands where people used them to fish. In China, kites lifted people for military purposes. The Maori people of New Zealand used kites to celebrate their belief that birds could carry messages between people and the gods. Their god Rehua is depicted as a bird, and is considered to be the ancestor of all kites. Invite students to conduct an exploration of the Maori culture, as well as the use of kites in their culture. Student research will be used to create an original kite.
Construction of kites begins with the spine and spar. With Crayola® School Glue, students attach the edges of two or more sheets of newspaper to create one large sheet. You can also use craft paper. Use a 30-inch (76 cm) long dowel as the vertical spine of your kite. Place a second, somewhat shorter dowel over the spine, about one-third of the way down. This horizontal dowel is called the spar. Use light, strong string to tie the pieces together. Glue the string and air-dry it.
An adult will cut a small notch in each end of student crossed dowels. Tie a loop in the end of a long string. Slide the string into the notch at the top of the crossed dowels and wrap it around the top of the dowel a few times. Pull the string snugly across the notch on one side of the spar and then through the bottom notch of the spine. Make a loop. Wrap the string around the bottom of the spine a few times, and then bring it up to the other side of the spar. Place it snugly in the notch, and then return it to the top of the spine. Wrap the string around the top a few times. Glue the string at the ends of each dowel. The crossed dowels should lay flat and have a loop at both the top and the bottom.
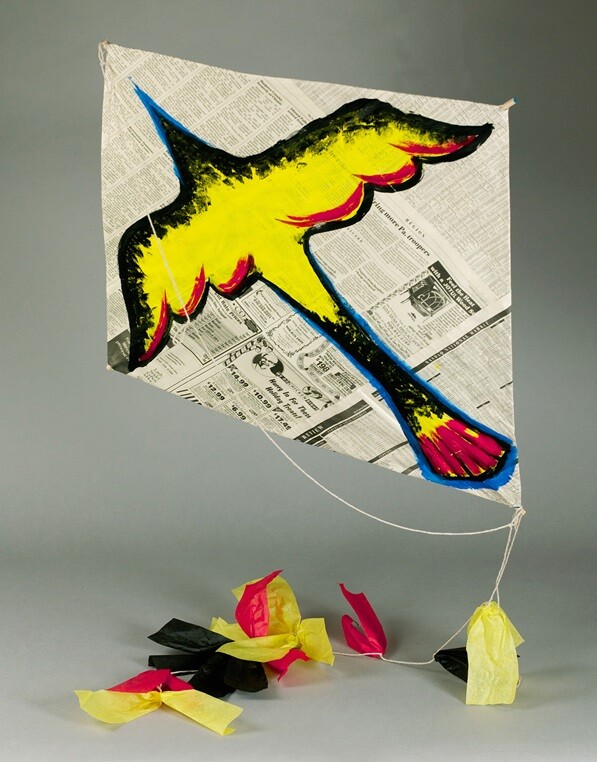
Students place crossed dowels on the newspaper. With Crayola Erasable Colored Pencils, trace the outline of the kite, using the string as a guideline. Draw a second line 2 inches (5 cm) outside the outline. Use Crayola Scissors to cut out the kite on the outside line.
Students paint their selected birds. Cover art area with recycled newspaper. Sketch the flying bird on the kite with colored pencils. Use Crayola Tempera Paint and brushes to paint the bird. Air-dry completely.
Assemble the kite. Turn the painted bird over. Place the dowel frame on the back of the kite. Fold the extra newspaper over the string and glue it in place. Air-dry the glue before continuing.
Turn the kite over. Cut a string longer than the kite’s height. Tie this string to the loop at the top. Tie a small loop in the string, slightly above the point where the two dowels cross each other. This string is called the bridle of the kite. Then tie the bridle to the loop at the bottom.
Tie another string, for the tail, to the bottom loop of the kite. Tie small strips of tissue paper to the string. (Traditional Maori kites did not have tails, so this step can be omitted.) Tie kite string to the bridle, and it's ready to fly! While flying kites, remind students to adjust the spacing of the loop on the bridle and the length of the tail to increase the kite’s stability.
Crayola

 © 2023 letsgokids


